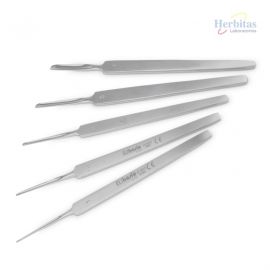
The handles for Italian gougias are designed to offer excellent performance in professional foot care. Made of 316 stainless steel or 316 aluminum (depending on the model), they ensure high resistance and durability. Their ergonomic handle is perfectly balanced to facilitate use, while the anti-slip grip areas ensure full control. In addition, they are designed for complete cleaning and sterilization, with no deep cavities that retain residues. The design allows the excess skin to be expelled during use.
USE INDICATIONS FOR SCALPEL HANDLES: Professional instrument designed to hold gougias in podiatric care procedures.
TECHNICAL FEATURES:
MATERIAL: 316 Stainless Steel | 316 Aluminum, depending on the model.
STERILIZABLE: Yes, in autoclave
DIMENSIONS: Length 12.5 cm
CONTENT: A plastic cover with the handle
COMPATIBILITY:
Compatible with Italian gougias number:
Ref. 13.108.1 and 13.108.3 with numbers: 0, 0.5, 1.
Ref. 13.108.2 and 13.108.4: with numbers: 2, 2.5, and 3.
Reference
13.108.1
13.108.2
13.108.3
13.108.4
Blade support
0, 0.5, 1
2, 2.5, 3
0, 0.5, 1
2, 2.5, 3
Gross weight
16 g
16 g
26 g
27 g
Net weight
13 g
12 g
23 g
24 g
Handle length
12.5 cm
12.5 cm
12.5 cm
12.5 cm
STORAGE:
Store at room temperature in a dry place.
Protect from heat, intense light, and dust.
WARNINGS:
Professional use.
The instrument must be cleaned, disinfected, and sterilized by the clinician before first use and after each use.
Check its proper functioning and perfect condition before using the product.
CLEANING AND CARE:
Initial recommendations:
Perform a visual and mechanical check of the new surgical instrument.
Visible dirt should be removed as soon as possible to avoid drying residues.
Avoid long waits before cleaning and disinfecting the instrument.
Preliminary manual cleaning:
Initially, it should be hand-washed with neutral soap.
In the operating room, the most visible dirt should be removed as soon as possible to avoid incrustation, which can lead to corrosion.
Long waits before reprocessing (<1h) should be avoided.
Dry cleaning is preferred, as medical products can corrode if immersed for long periods in solutions.
If the dry process is insufficient, they should be washed with cold water (<40ºC), including cavities, grooves, and hard-to-reach holes, which should be cleaned with pressurized water. Avoid areas left unwashed. A soft-bristled plastic brush can be used.
Thoroughly dry with an absorbent cloth that leaves no residues or with compressed air.
Cleaning and disinfection:
Immerse the products in a solution of distilled water with an appropriate disinfectant in an ultrasonic bath or container.
Follow the disinfectant manufacturer's instructions for selecting the wash program, temperature, and time.
Clean instruments with moving joints in the open position or by moving the joints to avoid "shadow areas." Follow the manufacturer's instructions for disassembling detachable instruments.
Instruments must be placed with a minimum distance between them in the cleaning container to prevent overlapping and avoid damage from collisions.
After the disinfection program is complete, wash the products with plenty of cold distilled water, paying special attention to the cavities, grooves, and hard-to-reach areas of the instrument, if possible, with pressurized water.
Thoroughly dry with an absorbent cloth that leaves no residues or with compressed air.
Lubrication:
Use Sterilit Protector Instrumental (ref. 13.859.1 and 13.859.2) to protect the instrument.
Attach the provided white plastic tube with the spray and apply the aerosol oil directly to the joint area or hard-to-reach areas.
Open and close the instrument several times to evenly distribute the oil and remove any excess oil with a lint-free cloth. Then, proceed with sterilizing the instrument, as the oil film is permeable to steam. It will act as a lubricant and anticorrosive without leaving stains on the instruments.
Sterilization:
Sterilize the products according to the corresponding national requirements.
The sterilization of the products must be done in an appropriate sterilization container.
https://herbitas.com/en/handle-italian-gouges.html1872Handles for Italian Gouges<style>#html-body [data-pb-style=J293Y14]{justify-content:flex-start;display:flex;flex-direction:column;background-position:left top;background-size:cover;background-repeat:no-repeat;background-attachment:scroll}</style><div data-content-type="row" data-appearance="contained" data-element="main"><div data-enable-parallax="0" data-parallax-speed="0.5" data-background-images="{}" data-background-type="image" data-video-loop="true" data-video-play-only-visible="true" data-video-lazy-load="true" data-video-fallback-src="" data-element="inner" data-pb-style="J293Y14"><div data-content-type="text" data-appearance="default" data-element="main"><h2><strong><span style="font-size: 28px; color: #000000;">HANDLES FOR ITALIAN GOUBIAS</span></strong></h2>
<p>The <strong>handles for Italian gougias</strong> are designed to offer excellent performance in professional foot care. Made of 316 stainless steel or 316 aluminum (depending on the model), <strong>they ensure high resistance and durability</strong>. Their <strong>ergonomic handle</strong> is perfectly balanced to facilitate use, while the <strong>anti-slip grip areas</strong> ensure full control. In addition, <strong>they are designed for complete cleaning and sterilization</strong>, with no deep cavities that retain residues. The design allows the excess skin to be expelled during use.</p>
<p> </p>
<p><strong>USE INDICATIONS FOR SCALPEL HANDLES:</strong><br>Professional instrument designed to hold gougias in podiatric care procedures.</p>
<p> </p>
<p><strong>TECHNICAL FEATURES:</strong></p>
<ul>
<li><strong>MATERIAL:</strong> 316 Stainless Steel | 316 Aluminum, depending on the model.</li>
<li><strong>STERILIZABLE:</strong> Yes, in autoclave</li>
<li><strong>DIMENSIONS:</strong> Length 12.5 cm</li>
<li><strong style="color: #333333;">CONTENT:</strong><span style="color: #333333;"> A plastic cover with the handle</span></li>
<li><strong style="color: #333333;" data-start="1509" data-end="1541">COMPATIBILITY</strong><span style="color: #333333;">:</span></li>
</ul>
<p>Compatible with Italian gougias number:</p>
<ul>
<li>Ref. 13.108.1 and 13.108.3 with numbers: 0, 0.5, 1.</li>
<li>Ref. 13.108.2 and 13.108.4: with numbers: 2, 2.5, and 3.</li>
</ul>
<table style="border-collapse: collapse; width: 99.9911%; border-color: #34495E; border-style: solid;" border="2">
<tbody>
<tr>
<td style="width: 19.984%;">
<p><strong>Reference</strong></p>
</td>
<td style="width: 19.984%; text-align: center;"><strong>13.108.1</strong></td>
<td style="width: 19.984%; text-align: center;"><strong>13.108.2</strong></td>
<td style="width: 19.984%; text-align: center;"><strong>13.108.3</strong></td>
<td style="width: 19.984%; text-align: center;"><strong>13.108.4</strong></td>
</tr>
<tr>
<td style="width: 19.984%;"><strong>Blade support</strong></td>
<td style="width: 19.984%; text-align: center;">0, 0.5, 1</td>
<td style="width: 19.984%; text-align: center;">2, 2.5, 3</td>
<td style="width: 19.984%; text-align: center;">0, 0.5, 1</td>
<td style="width: 19.984%; text-align: center;">2, 2.5, 3</td>
</tr>
<tr>
<td style="width: 19.984%;"><strong>Gross weight</strong></td>
<td style="width: 19.984%; text-align: center;">16 g</td>
<td style="width: 19.984%; text-align: center;">16 g</td>
<td style="width: 19.984%; text-align: center;">26 g</td>
<td style="width: 19.984%; text-align: center;">27 g</td>
</tr>
<tr>
<td style="width: 19.984%;"><strong>Net weight</strong></td>
<td style="width: 19.984%; text-align: center;">13 g</td>
<td style="width: 19.984%; text-align: center;">12 g</td>
<td style="width: 19.984%; text-align: center;">23 g</td>
<td style="width: 19.984%; text-align: center;">24 g</td>
</tr>
<tr>
<td style="width: 19.984%;"><strong>Handle length</strong></td>
<td style="width: 19.984%; text-align: center;">12.5 cm</td>
<td style="width: 19.984%; text-align: center;">12.5 cm</td>
<td style="width: 19.984%; text-align: center;">12.5 cm</td>
<td style="width: 19.984%; text-align: center;">12.5 cm</td>
</tr>
</tbody>
</table>
<p> </p>
<p> </p>
<h3><span style="color: #000000;"><strong>STORAGE:</strong></span></h3>
<ul>
<li>Store at room temperature in a dry place.</li>
<li>Protect from heat, intense light, and dust.</li>
</ul>
<p> </p>
<h3><span style="color: #000000;"><strong>WARNINGS:</strong></span></h3>
<ul>
<li>Professional use.</li>
<li>The instrument must be cleaned, disinfected, and sterilized by the clinician before first use and after each use.</li>
<li>Check its proper functioning and perfect condition before using the product.</li>
</ul>
<p> </p>
<h3><span style="color: #000000;"><strong>CLEANING AND CARE:</strong></span></h3>
<p><strong>Initial recommendations:</strong></p>
<ul>
<li>Perform a visual and mechanical check of the new surgical instrument.</li>
<li>Visible dirt should be removed as soon as possible to avoid drying residues.</li>
<li>Avoid long waits before cleaning and disinfecting the instrument.</li>
</ul>
<p><strong>Preliminary manual cleaning:</strong></p>
<ul>
<li>Initially, it should be hand-washed with neutral soap.</li>
<li>In the operating room, the most visible dirt should be removed as soon as possible to avoid incrustation, which can lead to corrosion.</li>
<li>Long waits before reprocessing (<1h) should be avoided.</li>
<li>Dry cleaning is preferred, as medical products can corrode if immersed for long periods in solutions.</li>
<li>If the dry process is insufficient, they should be washed with cold water (<40ºC), including cavities, grooves, and hard-to-reach holes, which should be cleaned with pressurized water. Avoid areas left unwashed. A soft-bristled plastic brush can be used.</li>
<li>Thoroughly dry with an absorbent cloth that leaves no residues or with compressed air.</li>
</ul>
<p><strong>Cleaning and disinfection:</strong></p>
<ul>
<li>Immerse the products in a solution of distilled water with an appropriate disinfectant in an ultrasonic bath or container.</li>
<li>Follow the disinfectant manufacturer's instructions for selecting the wash program, temperature, and time.</li>
<li>Clean instruments with moving joints in the open position or by moving the joints to avoid "shadow areas." Follow the manufacturer's instructions for disassembling detachable instruments.</li>
<li>Instruments must be placed with a minimum distance between them in the cleaning container to prevent overlapping and avoid damage from collisions.</li>
<li>After the disinfection program is complete, wash the products with plenty of cold distilled water, paying special attention to the cavities, grooves, and hard-to-reach areas of the instrument, if possible, with pressurized water.</li>
<li>Thoroughly dry with an absorbent cloth that leaves no residues or with compressed air.</li>
</ul>
<p><strong>Lubrication:</strong></p>
<ul>
<li>Use Sterilit Protector Instrumental (ref. 13.859.1 and 13.859.2) to protect the instrument.</li>
<li>Attach the provided white plastic tube with the spray and apply the aerosol oil directly to the joint area or hard-to-reach areas.</li>
<li>Open and close the instrument several times to evenly distribute the oil and remove any excess oil with a lint-free cloth. Then, proceed with sterilizing the instrument, as the oil film is permeable to steam. It will act as a lubricant and anticorrosive without leaving stains on the instruments.</li>
</ul>
<p><strong>Sterilization:</strong></p>
<ul>
<li>Sterilize the products according to the corresponding national requirements.</li>
<li>The sterilization of the products must be done in an appropriate sterilization container.</li>
</ul>
</div></div></div>https://herbitas.com/media/catalog/product/g/u/gubias-tipo-italiano.jpg28instock282800Herbitas000https://herbitas.com/media/catalog/product/g/u/gubias-tipo-italiano.jpg178217903003/Gouge Blades2017-09-05T06:00:44+0000shop1